




Jan. 01, 1970
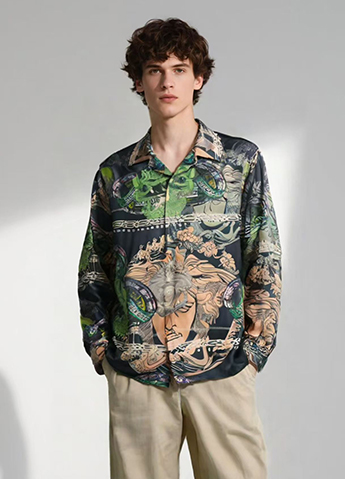
Creating a professional all-over shirt begins with more than choosing an attractive graphic. With this Guide to Print Scale and Placement for All-Over Shirt Designs, I will show you how to prepare artwork, calculate print dimensions, position key motifs, select the right production method, and inspect the finished garment. Whether you are developing a Digital Print Shirt For Men for a new collection or working with an all-over print shirt manufacturer on a bulk order, the process becomes reliable when you control the artwork at 1:1 scale, account for seam movement, use a minimum 300 DPI raster file, and approve a physical sample before production. Meninthemirror designers, sourcing teams, and independent fashion brands can use the same workflow to reduce distortion, prevent off-center graphics, and maintain consistent color from the first shirt to the last.
!
The most common mistake is designing a beautiful pattern before confirming how the shirt will be manufactured. An all-over print may be applied to a finished blank garment, printed onto fabric before cutting, or produced through cut-and-sew sublimation. Each method affects scale, alignment, color, and seam continuity.
Before opening Adobe Illustrator, Photoshop, or another design platform, I recommend confirming the following specifications with your production partner:
A qualified all-over print shirt manufacturer should provide a technical pack template or panel pattern. If the manufacturer cannot confirm printable width, shrinkage, or panel dimensions, the risk of misalignment increases significantly.
For a polyester Digital Print Shirt For Men, dye sublimation is often selected because the ink becomes part of the fiber rather than forming a heavy surface film. This supports breathable hand feel and continuous all-over coverage.
Other methods may be more appropriate in different situations:
| Printing method | Suitable application | Main advantage | Main limitation |
|---|---|---|---|
| Dye sublimation | Polyester and polyester-rich fabric | Full-coverage color and soft hand feel | Requires compatible synthetic fibers |
| Reactive digital printing | Cotton and cellulosic fibers | Strong fiber penetration and natural-fiber compatibility | Requires pretreatment and washing |
| Direct-to-garment | Finished garments and localized graphics | Efficient for small runs | Less suitable for true seam-to-seam coverage |
| Screen printing | Limited spot colors or strategic graphics | High opacity and repeatability | Not ideal for photographic all-over artwork |
The print method determines whether the artwork should be prepared as separate panels or as one continuous repeat. A specialist all-over print shirt manufacturer can also advise whether the fabric will be printed before or after cutting.
Once the garment specifications are confirmed, create the production file at actual size. Do not design only on a small mockup and enlarge it later. Enlargement can reduce raster sharpness, alter line weight, and change the visual relationship between motifs.
For most production workflows, I use these baseline settings:
For example, if the front panel measures 560 mm wide by 700 mm high, prepare the artwork at that exact size, then add the required bleed. A 100 mm logo should remain 100 mm in the production file—not 100 pixels in a low-resolution mockup.
An all-over pattern should look intentional when it is divided across the body. Common repeat structures include:
Small motifs usually tolerate seam movement better than large central graphics. If your main artwork includes faces, animals, text, or branded symbols, place them away from armholes, side seams, button stands, and collar edges.
Print scale controls how the design is perceived from a distance and at close range. A pattern that looks balanced on a monitor may appear oversized when printed on a real shirt.
I divide print scale into three practical categories:
Motifs are generally 5 mm to 25 mm wide. This scale works well for:
Micro-scale artwork can become visually noisy if contrast is too high. Very thin lines may also disappear during printing or fabric distortion, so I avoid strokes below 0.5 mm unless the printer confirms they will hold after production.
Motifs are generally 25 mm to 100 mm wide. This is the most versatile range for commercial shirts because the print remains visible without overwhelming the silhouette.
Medium-scale patterns are useful for:
For a balanced Meninthemirror shirt, medium-scale artwork often provides the best combination of readability, wearability, and repeat consistency.
Motifs exceed 100 mm and may extend across a full chest, back, or sleeve. Oversized placement creates a statement effect but requires careful panel engineering.
Use oversized graphics when:
A large graphic should be checked on both a flat technical layout and a 3D garment mockup. Perspective can make a chest graphic appear smaller or more distorted than it is in the flat file.
After scale is approved, divide the shirt into placement zones. This prevents important artwork from landing in areas where construction will interrupt it.
The front panel is the primary commercial viewing zone. For an engineered design:
If the shirt has a visible button stand, I usually shift the artwork slightly or create a dedicated placket panel. This prevents letters and symmetrical motifs from appearing broken.
The back can support a larger motif because it has fewer construction interruptions.
Recommended checks include:
A large back motif may require engineered placement rather than a standard repeat. This is one area where an experienced all-over print shirt manufacturer can prevent costly panel mismatches.
Sleeves create a three-dimensional print surface and often produce unexpected distortion.
For short sleeves:
For long sleeves, assess the design in both relaxed and extended positions. A vertical stripe can look straight on a flat panel but spiral when sewn into the sleeve.
Small components require their own pattern pieces. Never assume that the body repeat will automatically align with a collar or pocket.
Before approval, check:
If a pocket is a focal feature, use a “match pocket” instruction in the tech pack and specify the acceptable tolerance. A tolerance of ±2 mm may be achievable for premium engineered placement, while larger production runs may require a wider tolerance depending on fabric behavior.
A strong tech pack converts creative intent into measurable manufacturing instructions. I include a separate page for each panel and mark the artwork orientation clearly.
Your tech pack should contain:
Use fixed reference points such as the center front, shoulder notch, armhole notch, and hem line. Avoid instructions such as “place the logo near the chest,” because they are open to interpretation.
A production note should state whether the design must match across seams or whether a natural repeat is acceptable. This single distinction can change the labor cost and sample approval process.
A digital proof is useful, but it cannot reveal every production problem. Before approving bulk production with an all-over print shirt manufacturer, I recommend a three-stage review.
Use preflight tools to check:
A 300 DPI file is a reliable baseline, but resolution alone does not guarantee quality. A stretched image, compressed JPEG, or incorrect ICC profile can still create banding and color variation.
A strike-off is a small printed fabric test used to evaluate color, sharpness, saturation, and hand feel. Review it under consistent lighting, preferably around D65 daylight conditions.
Inspect:
Do not approve a strike-off only from a phone screen. Screen brightness and color temperature can conceal major differences.
The sewn prototype reveals issues that a flat fabric test cannot show:
Measure the prototype against the approved specification. I recommend recording each result to the nearest 1 mm for garment dimensions and 0.01 mm for digital artwork coordinates where applicable.
Print quality should be measured rather than described with vague terms such as “good color” or “high quality.” A professional all-over print shirt manufacturer should define inspection criteria before production begins.
Useful references may include:
These standards do not replace a brand-specific quality manual. They provide a structured basis for testing fabric performance, color retention, and durability.
A practical inspection plan may include:
For Meninthemirror collections, I would also maintain a “golden sample”—the final approved garment used as the reference for color, scale, construction, and finishing.
This usually occurs because the artwork was judged on a flat screen rather than on a garment. Reduce motif dimensions by 10% to 20%, print a half-scale paper mockup, or test the artwork on a sewn prototype.
The panel dimensions, repeat size, or cutting alignment may be incorrect. Add seam allowance to the artwork, provide matching notches, and clarify whether the seam must be engineered for continuity.
Possible causes include an incorrect color profile, unsuitable fabric, insufficient ink penetration, or printer-specific gamut limitations. Request a calibrated strike-off and compare it under controlled lighting.
Increase line weight, simplify the graphic, or raise contrast. Lines under 0.5 mm should be tested before bulk production, especially on textured or brushed fabrics.
The sleeve may have been placed in the wrong grain direction or the artwork orientation may not match the cut file. Mark “top sleeve,” “under sleeve,” “front,” and “back” directly on every panel.
Confirm shrinkage before finalizing print scale. If the fabric shrinks by 3%, a 500 mm artwork area may reduce by approximately 15 mm. The production team should compensate in the pre-print file only after measured testing.
A standard pocket application can interrupt a repeat. Supply a dedicated pocket panel and specify whether exact motif matching is required. For premium Digital Print Shirt For Men collections, the added cutting and placement cost may be justified by the improved finish.
A repeatable workflow reduces errors and speeds up communication with an all-over print shirt manufacturer. Useful tools include:
Keep every revision clearly labeled. A simple structure such as
In one typical resort-shirt development scenario, the first artwork used 180 mm tropical leaves across the front and sleeves. On the screen, the composition looked premium. After sewing, however, several leaves landed across the armhole and appeared truncated.
The corrective process was straightforward:
The result was a cleaner visual hierarchy, fewer seam interruptions, and more consistent presentation across sizes. This example demonstrates why a technically accurate Guide to Print Scale and Placement for All-Over Shirt Designs must include pattern engineering, not just aesthetic review.
When evaluating an all-over print shirt manufacturer, I ask for evidence rather than relying only on catalog images.
Request:
A supplier that can explain sublimation transfer, ICC profiling, panel registration, shrinkage compensation, and AQL inspection is more likely to understand the technical demands of all-over production.
Before releasing a purchase order, I use this checklist:
A successful all-over shirt is created by connecting creative design with production engineering. Start with the garment pattern, choose the printing method according to the fabric, build artwork at actual size, control scale by millimeters, protect critical motifs from seams, and approve both a fabric strike-off and sewn prototype. Use ASTM, AATCC, ISO, or DIN-based testing where appropriate, maintain a golden sample, and require documented inspection from your all-over print shirt manufacturer.
When these steps are followed, Meninthemirror can develop distinctive all-over shirts with sharper placement, more reliable color, and fewer costly production corrections. The same disciplined process also helps buyers source a dependable all-over print shirt manufacturer, create better digital print shirts for men, and turn a screen-based concept into a commercially ready garment.
Latest News

Placement Print vs All-Over Print for Men's Graphic Shirts
Choosing between a placement print and an all-over design becomes difficult when a shopper is comparing the best placement print graphic shirts for men, all-over print men's shirts for streetwear, or a custom stylish printed shirt for men. A reliable men's graphic shirt supplier must explain more than appearance: screen printing affects ink thickness, sublimation printing affects color
Jan. 01, 1970
Stock Fabric vs Custom-Dyed Fabric for Private Label T-Shirts
For a t shirt manufacturer private label project, the choice between stock fabric and custom-dyed fabric affects more than color. It influences minimum order quantity, production speed, shade consistency, fabric performance, cash flow, and the success of future reorders. Meninthemirror helps brands evaluate these factors before committing to a fabric program.
Jan. 01, 1970
Top Collar Construction Details for Men's Leisure Shirts
Today’s leisure shirt manufacturer is designing for more than appearance: men want a collar that stays balanced during commuting, relaxed office work, travel, and weekend dining. The most useful buying terms include men’s casual button-down shirts, best collar styles for men’s leisure shirts, and custom men’s resort shirts. Behind these details are the LSI concepts of smart-casual
Jan. 01, 1970
Let's Take This Forward!
Feel free to reach out for any queries. We would be happy to help!

